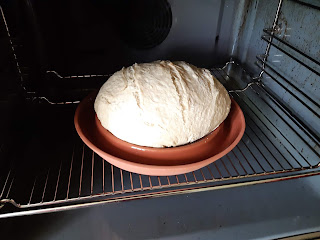
For those not familiar with this item of cookware, "the traditional tajine pottery, sometimes painted or glazed, consists of two parts: a circular base unit that is flat with low sides and a large cone- or dome-shaped cover that sits on the base during cooking. The cover is designed to return all condensation to the bottom. That process can be improved by adding cold water into the specially designed well at the top of the lid."[1]
Moreover, The Spring Oven's design owes much to the ancient "clibanus" (also called "testum"). An excellent guide to how one of these ovens can be used was written by Sally Grainger for The British Museum Blog[2]. At Tastes Of History we regularly was a version crafted by Graham Taylor of Potted History at Roman themed cooking events and demonstrations to bake bread and other dishes. So, The Spring Oven's provenance is tried and tested from antiquity to the modern times.

The Spring Oven's selling point is to allow steam to circulate within the vessel without the need for extra trays or pots of water. By filling the integral channel surrounding the baking platform with water, steam is generated during the cooking process. This acts to keep the surface of the dough moist helping the bread to rise and to produce a good crust. Just like a tajine, the lid's shape ensures condensed steam returns to the water channel thereby retaining a high humidity baking environment.
Instructions for using The Spring Oven are not overly long or complicated. They cover seasoning the oven on receipt and before the first bake it is also advised to sprinkle a little flour on the base before placing the dough. The latter will help release the bread after baking. So far we have found the temperature guides and timings provided in the how to use the oven section to be spot on. We will see if these guides remain consistent with further experimentation using different doughs. The instructions end with how to care for the product. From experience do follow this information, especially to avoid potential cracking from the thermal shock resulting from rapid cooling of the hot terracotta.
The ciabatta bread recipe we chose to use makes one loaf or ten rolls. It is taken directly from the packet of Wright's Baking Ciabatta Bread Mix, albeit the baking instructions were adjusted to account for using The Spring Oven.
Dough Ingredients
500 g Wright's bread mix;
350 ml lukewarm water;
15 ml (1 tbsp) olive oil.
Hand Baking Method
1. Place the bread mix in a bowl, add the water and kneed for 5 minutes to form a ball of dough. Add 15 ml (1 tbsp) of olive oil and kneed for a further 1 minute.
2. Place the sticky dough on a floured surface forming it into either a loaf as we did or a more typical ciabatta rectangle roughly 30 cm by 15 cm. Leave to rest for 10 minutes.
3. Shape the dough and place on a greased baking tray or large loaf tin (for rolls divide into 10 small balls). Dust the top with flour and cover with a damp cloth or loose clingfilm. Leave to rise in a warm place for 25 to 30 minutes until the dough doubles in size.
4. Using The Spring Oven: Pre-heat oven to 220°C (430°F, gas mark 7). Carefully pour an additional 150 ml of warm water in the channel that surrounds the base of The Spring Oven, making sure the water does not splash onto the base.
5. With the lid on, place The Spring Oven in the pre-heated oven for 15 minutes. After 15 minutes, carefully take The Spring Oven out, using gloves, remove the lid and place the dough on the base. Score the top of the dough, replace the lid and carefully return to the oven for 15 minutes at 220°C (430°F, gas mark 7).
7. Remember to allow the terracotta lid and base to cool naturally.
First impressions are excellent. The Spring Oven is simple to use, the instructions are clear and easy to follow, and the results so far have been exceptionally tasty. Indeed, we meant to photograph the baked loaf after removal from the oven but the smell of fresh baked bread was just too tempting. Hot bread straight from the oven smothered in butter - what's not to love!
Notes:
1. Wikipedia, "Tajine" retrieved May18th, 2020.
2. Grainger, S. (2013), "From Parthian chicken to flat breads: Experimenting with a Roman oven", The British Museum Blog, retrieved May 18th, 2020.


Hi, Thanks your for sharing blog on
ReplyDeleteOven for bakery.
Gee Gee Foods is here to get you the best oven for bakery , which is studded with many features as well.
ReplyDeletegood quality.
ReplyDeleteget you the best oven for bakery
ReplyDelete